How To Disable And Enable Laptop Keyboard?
- Step-by-step guide: Disable laptop keyboard
- Instructions for a laptop on the Windows 10 operating system
- Keep in mind!
- Instructions for a laptop on the operating system Windows 7
- What else do you need to know about your laptop keyboard?
- Enable or disable the on-screen keyboard
- Disabling some buttons on your laptop keyboard
- Conclusion: How To Disable And Enable Laptop Keyboard?
- Frequently Asked Questions
If you are reading this article, then you probably imagine under what circumstances it may be necessary to turn off the laptop keyboard. The only thing you need to understand before you start following the instructions is that this can come in handy if something breaks, or if you have a reliable external keyboard that you want to connect to a laptop.
Since there are a lot of versions of the Windows operating system, for each of them there is a special instruction, using which you can easily and without problems disable or enable the laptop keyboard.
Step-by-step guide: Disable laptop keyboard
Disabling the native laptop keyboard may be required if, for example, you bought a good external keyboard and set it up perfectly for yourself. Of course, in this case, it is not necessary to turn off the keyboard on the laptop, but in this case there may be accidental clicks, and this, in turn, causes some inconvenience.
Considering the fact that the operating system provides the ability to disable the standard keyboard, this process should not scare you and seem complicated. Let's take a closer look at the instructions for different operating systems.
Instructions for a laptop on the Windows 10 operating system
I decided to start reading the instructions with this operating system, since it is currently the most popular. Of course, there are people who use Windows 8, or even earlier versions. But about everything in more detail and in order.
As mentioned earlier, turning off the keyboard may be required in different situations - buying an external keyboard, or you decide to clean your regular keyboard. Let's consider the step-by-step actions:
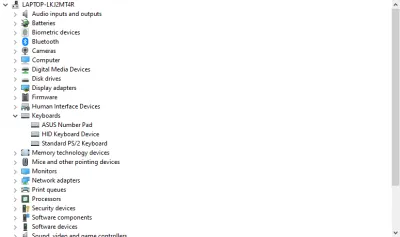
- In your computer settings, you need to find Device Manager. In this window, you need to find the Keyboard settings;
- Having opened this settings column, you should find your built-in keyboard by its name;
- Once you have found the name, you need to right-click on it and click on the remove device button. After performing these simple steps, your built-in keyboard should stop working.
Keep in mind!
It is very important to remember one important point - before you do this, you must have a working external keyboard on hand, or even better several. This method only means one thing, at this point your keyboard will be put to sleep.
Instructions for a laptop on the operating system Windows 7
The method itself is very similar to the one described earlier, with the only difference being that these operating systems have a very different interface.
- In order to start executing the instructions, you need to click the Start button and also find the Device Manager;
- The device manager will open, in which the settings will be projected onto you;
- In this device manager, you need to look for Keyboard. Once you find it, you have to right-click and this way you will find the keyboard driver;
- Also, as in the previous instructions, you need to right-click on the driver and click Delete Keyboard;
- After that, it is better to restart your laptop so that everything works correctly in the future.
What else do you need to know about your laptop keyboard?
Not all users know that in addition to the usual keyboard, their laptop has a lot of other interesting things. For example, this is an on-screen keyboard.
Enable or disable the on-screen keyboard
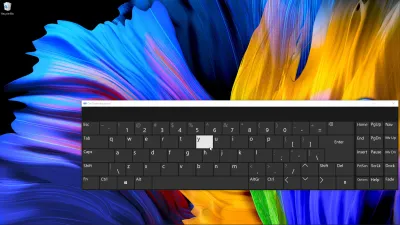
The Windows 10 operating system has such an interesting feature as the on-screen keyboard. Sometimes this can be very convenient, including if your laptop has touch input. But even if not, it is still very convenient to print from it.
Win + Ctrl + O: Enable on-screen keyboard on WindowsThis version of the operating system is very thoughtful, so in order to enable or disable the on-screen keyboard, at any time you can press the key combination Win + Ctrl + O.
Disabling some buttons on your laptop keyboard
At first it may seem that you are waiting for a long and complicated instruction, but in fact it is not.
In order to disable some buttons on your laptop keyboard, you first need to download a free software called Simple Disable Key, and then follow the short instructions that will be described below.
- To begin with, you must find this program on the Internet and download its most modern version;
- When the program is downloaded and installed, you need to name the option, which is called Key;
- Then you just need to press the buttons that you want to disable;
- After that, you will need to click on the Add Key button;
- A window will open in which a choice will be offered - disable buttons when working in certain programs, or disable them completely;
- At the end of the operation you will only need to click OK, and the process will be successfully saved, after which you can check that this method is really working.
Conclusion: How To Disable And Enable Laptop Keyboard?
Thus, having considered all the available options for disabling the keyboard, you can come to the conclusion that it is very simple to do this, and the goals that you can pursue can be very different.
Frequently Asked Questions
- How to enable and disable keyboard on laptop?
- There are several available and effective options for disabling and enabling the keyboard. So don't worry about it too easily. All available options are written in the article above.
- What are the steps to temporarily disable and then re-enable a laptop's keyboard?
- To disable a laptop keyboard, you can go into the device manager, locate the keyboard in the list of devices, right-click on it, and select 'Disable.' To re-enable it, follow the same steps but select 'Enable.' Alternatively, for temporary disabling, you can use third-party software or keyboard shortcuts, if available. Remember, these methods may vary depending on your laptop's make and model.


